|
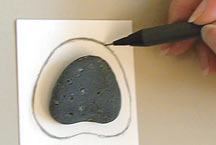
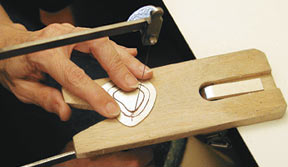
 Fit a saw blade
through the drill hole and remove the inner opening. File out the opening. Sit
the stone on the opening and determine if additional filing is necessary for
a better seat. File until the stone sits well, while making sure enough metal
is left to support the bezel for the stone, and then sand the edges until smooth. Fit a saw blade
through the drill hole and remove the inner opening. File out the opening. Sit
the stone on the opening and determine if additional filing is necessary for
a better seat. File until the stone sits well, while making sure enough metal
is left to support the bezel for the stone, and then sand the edges until smooth.
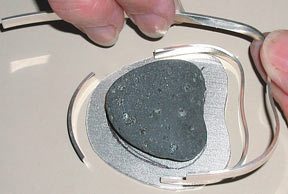
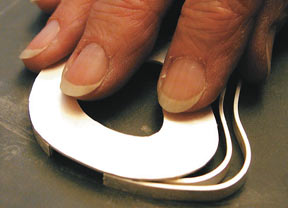
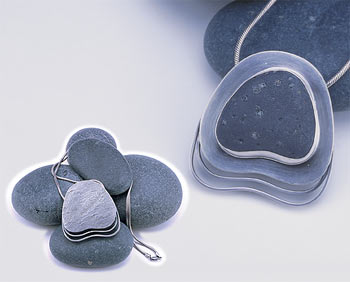
 Using
either 3mm or 4mm x 1mm rectangular sterling wire and your fingers or half-round
pliers, form “walls” for the piece. These walls will perform several
functions: support the base plate to a “floor” or back, provide two
openings through which a chain can be placed, and add to the design of the pendant
through the addition of some interesting negative space. Three components should
be formed from this wire: a small top that will support a chain, and two curvilinear
bottoms, one that fits inside the other. The top wire should exactly fit within
the top of the base plate. The larger of the bottom two should fit within the
far sides of the pendant. Be careful that the space between the top wire and
the bottom two provides enough space for the desired chain or neck collar to
pass through. File and sand the edges of all the wires. Using
either 3mm or 4mm x 1mm rectangular sterling wire and your fingers or half-round
pliers, form “walls” for the piece. These walls will perform several
functions: support the base plate to a “floor” or back, provide two
openings through which a chain can be placed, and add to the design of the pendant
through the addition of some interesting negative space. Three components should
be formed from this wire: a small top that will support a chain, and two curvilinear
bottoms, one that fits inside the other. The top wire should exactly fit within
the top of the base plate. The larger of the bottom two should fit within the
far sides of the pendant. Be careful that the space between the top wire and
the bottom two provides enough space for the desired chain or neck collar to
pass through. File and sand the edges of all the wires.
 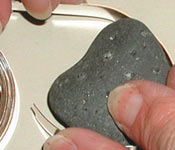 Using
fine silver wire that is slightly taller than the highest part of the stone and
26- or 28-gauge thick fine silver wire, form a bezel around the stone. Using
hand shears, trim the bezel so that it is ever so slightly larger than the perimeter
of the stone and both ends match up perfectly. Using
fine silver wire that is slightly taller than the highest part of the stone and
26- or 28-gauge thick fine silver wire, form a bezel around the stone. Using
hand shears, trim the bezel so that it is ever so slightly larger than the perimeter
of the stone and both ends match up perfectly.
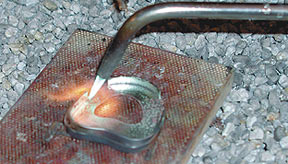
Flux and solder the two ends together
with hard solder. Pickle the bezel and test to make sure the stone just fits.
  Prepare
another piece of 20- or 22-gauge sterling, enough to match up size-wise with
the base plate. This will be the bottom of your pendant. If you desire this back
to be patterned, do so. There are many options that can be used. My preference
is to use brass plates through a rolling mill. Anneal the sterling that is to
be used, pickle it, dry it, and run it through the rolling mill with the desired
pattern sheet. In either case, take this patterned sheet with the pattern facing
up and put the base plate down on top of it with the BOTTOM of the base plate
facing down. Prepare
another piece of 20- or 22-gauge sterling, enough to match up size-wise with
the base plate. This will be the bottom of your pendant. If you desire this back
to be patterned, do so. There are many options that can be used. My preference
is to use brass plates through a rolling mill. Anneal the sterling that is to
be used, pickle it, dry it, and run it through the rolling mill with the desired
pattern sheet. In either case, take this patterned sheet with the pattern facing
up and put the base plate down on top of it with the BOTTOM of the base plate
facing down.
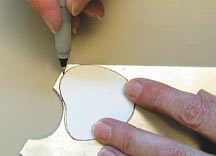
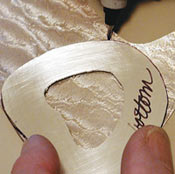
Trace the base plate onto the sterling. It is important that
you do not put the base plate facing up because the patterned back must be the
mirror image of the top of the base plate. File and sand the edges of this bottom.
  At
this point you should have 6 finished components, the base plate or top of the
piece, the top wall, the bottom two walls, the patterned bottom and a bezel for
the stone. At
this point you should have 6 finished components, the base plate or top of the
piece, the top wall, the bottom two walls, the patterned bottom and a bezel for
the stone.
 Take
the base plate and place it bottom side up on a very flat soldering surface.
Flux the side that is up. Flux the rectangular wires. Place the top wire at the
very edge of the top of the piece. Now place the bottom two wires so that they
fit within the edges of the far sides of the piece. To make sure they lie flat
against the base plate, use broken old saw blades or T-pins under them but make
sure the props don’t touch the base plate itself. Take
the base plate and place it bottom side up on a very flat soldering surface.
Flux the side that is up. Flux the rectangular wires. Place the top wire at the
very edge of the top of the piece. Now place the bottom two wires so that they
fit within the edges of the far sides of the piece. To make sure they lie flat
against the base plate, use broken old saw blades or T-pins under them but make
sure the props don’t touch the base plate itself.
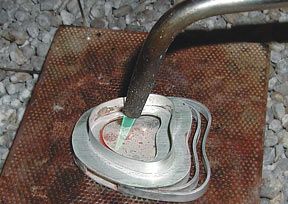
Place snippets of medium
solder along the inside edges of all the wire that is touching the base plate.
Heat this configuration until the solder flows and completely fills all the surfaces
that make contact. Be careful to finish the soldering by heating the outside
edges so that the solder flows through to the outside of the piece. This is one
of those times where excess solder is less of a problem than too little solder.
Pickle this configuration, rinse and dry.
 Place
this in-process piece top side up on 220-grit emery cloth. Sand this bottom of
the three wires until they are all at the same level. When they are, final sand
with 400-grit emery cloth. Place
this in-process piece top side up on 220-grit emery cloth. Sand this bottom of
the three wires until they are all at the same level. When they are, final sand
with 400-grit emery cloth.
 Take
the piece you’ve formed for the back side of the pendant and place it with
the pattern down, i.e. inside surface facing up, on your flat soldering surface.
Take the top component that you’ve formed in Steps 11 and 12 and place
it nearby on the soldering surface with the wire side facing up. Flux all the
surfaces that are facing up. Put medium solder snippets on the back side of the
pendant where it will match up with the wires. Heat the piece until the solder
flows. If necessary, help spread the solder where it needs to flow with a soldering
pick. This is another place where too much solder is better than two little. Take
the piece you’ve formed for the back side of the pendant and place it with
the pattern down, i.e. inside surface facing up, on your flat soldering surface.
Take the top component that you’ve formed in Steps 11 and 12 and place
it nearby on the soldering surface with the wire side facing up. Flux all the
surfaces that are facing up. Put medium solder snippets on the back side of the
pendant where it will match up with the wires. Heat the piece until the solder
flows. If necessary, help spread the solder where it needs to flow with a soldering
pick. This is another place where too much solder is better than two little.

 Using
a tweezers with heat resistant handles, turn this back piece over, with the patterned
side showing, and place it exactly where it matches up appropriately with the
rectangular wires that are facing up from the top component. Heat carefully,
mostly from the sides, until the solder flows and completely fills in the gaps
between the two sides. Pickle, rinse and dry. Using
a tweezers with heat resistant handles, turn this back piece over, with the patterned
side showing, and place it exactly where it matches up appropriately with the
rectangular wires that are facing up from the top component. Heat carefully,
mostly from the sides, until the solder flows and completely fills in the gaps
between the two sides. Pickle, rinse and dry.

 As
in Step 12, take this in-process configuration and sand the top of the pendant
until even and smooth. Start with 220-grit emery cloth and finish with 400. Take
your bezel and sand the bottom of it until it too is totally flat. Check to make
sure it still fits the stone perfectly. When both the top side of the pendant
and the bottom of the bezel are flat and smooth, flux both surfaces. Place the
bezel in the appropriate place on the top side of the pendant. Place medium solder
snippets on the bottom inside edges of the bezel. In contrast to earlier soldering
steps, using excess solder is not recommended. Heat the piece until the solder
flows evenly and fills in the seams between the two surfaces perfectly. Pickle,
rinse and dry. As
in Step 12, take this in-process configuration and sand the top of the pendant
until even and smooth. Start with 220-grit emery cloth and finish with 400. Take
your bezel and sand the bottom of it until it too is totally flat. Check to make
sure it still fits the stone perfectly. When both the top side of the pendant
and the bottom of the bezel are flat and smooth, flux both surfaces. Place the
bezel in the appropriate place on the top side of the pendant. Place medium solder
snippets on the bottom inside edges of the bezel. In contrast to earlier soldering
steps, using excess solder is not recommended. Heat the piece until the solder
flows evenly and fills in the seams between the two surfaces perfectly. Pickle,
rinse and dry.
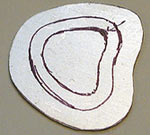
 File
and sand all edges of the pendant until they are totally smooth and have a look
of continuous metal. Temporarily place the stone inside the finished pendant
and mark where the height of the bezel needs to be adjusted. Using sanding sticks
adjust the bezel height. If you wish to emphasize the back pattern and/or the
negative space of the pendant, patina this completely soldered piece. Using 0000
steel wool, remove the patina from all the desired top surfaces and finish off
the piece with a somewhat matte surface. File
and sand all edges of the pendant until they are totally smooth and have a look
of continuous metal. Temporarily place the stone inside the finished pendant
and mark where the height of the bezel needs to be adjusted. Using sanding sticks
adjust the bezel height. If you wish to emphasize the back pattern and/or the
negative space of the pendant, patina this completely soldered piece. Using 0000
steel wool, remove the patina from all the desired top surfaces and finish off
the piece with a somewhat matte surface.
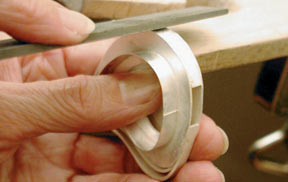
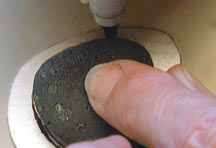
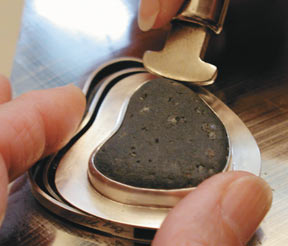
 Place
the stone in the bezel. Using a bezel pusher, tack the stone in place starting
with the sharpest angles first. Once the bezel is fully pushed in all the way
around, use a burnisher to smooth out any irregularities. Touch up the pendant’s
finish using more 0000 steel wool. Place a chain, cable or neck collar through
the two side openings and you have a finished pendant ready to wear. Place
the stone in the bezel. Using a bezel pusher, tack the stone in place starting
with the sharpest angles first. Once the bezel is fully pushed in all the way
around, use a burnisher to smooth out any irregularities. Touch up the pendant’s
finish using more 0000 steel wool. Place a chain, cable or neck collar through
the two side openings and you have a finished pendant ready to wear.
|

 A
Rock in a Hard Place
A
Rock in a Hard Place